Sometimes you find yourself in a lighting situation that demands a bit more than 'average metering'. Take the image below for example. The foreground of
image 1 was in heavy shadow, while the mountainside was being lit by a strong band of sunlight. If one points the camera at the scene and relies on average metering the result will be washed highlights on both the mountain and in the sky,
while the foreground will be close to correctly exposed . . .
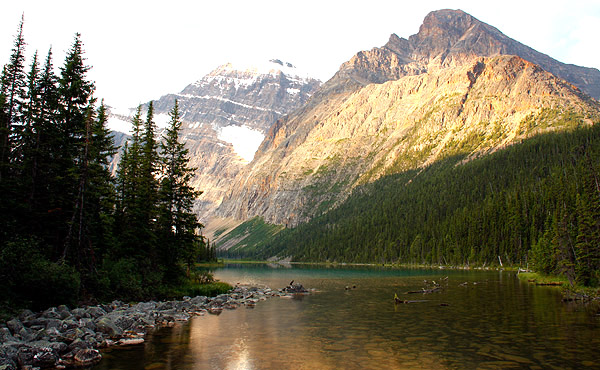
Image 1: An 'average' exposure of the scene, and consequently the
highlights are blown out.
Mount Edith Cavell, Jasper national park, Alberta,
Canada
Seeing that we've lost detail in the mountains and sky, we need to compensate for the problem.
We'll ignore a graduated gray filter or the software use of a gradient to darken
the sky as this is an exposure lesson! Those exposure options are spot-metering off the well-lit portions of the mountain, or manually underexposing by anything from say half a stop under, to one and a half stops under
to properly exposure the sky and mountain top. If we do this, the result is likely to look like
image 2 . . .
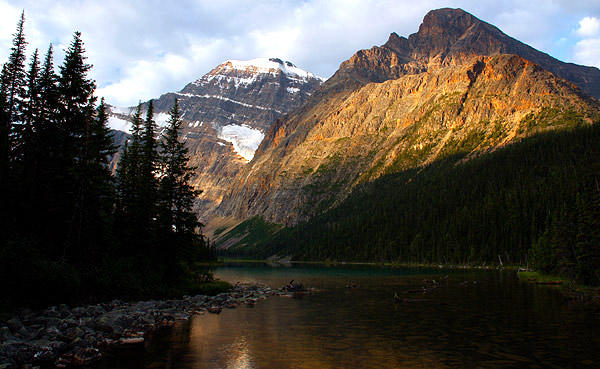
Image 2: An exposure for the highlights. If there is a down side,
it's that the foreground is a little on the dark side.
Now I have what looks like the correct exposure, and I personally find it pleasing. The tonal range among the highlights is just right, but perhaps a little dense in the shadow areas. In ye olde days of film of slides that would be that, but in this digital age we can play with the shadows a little bit.
Unfortunately however, the trend nowadays is to take the 'correction' process a little too far when using Photoshop's shadow/highlight
filter, as it is being used for exposure correction. Search the web and you'll find such images similar to image 3 below on which I have intentionally applied the overuse of shadow/highlight . . . i.e. I have used the shadow feature to lighten the
shadow regions of the image. I've overdone it obviously, and the image lacks
contrast . . .

Image 3: A version 'fixed' with the use of Photoshop's 'shadow'
filter.
I may be treading on many toes here, but this is a common mistake, and the result is a 'wishy-washy' image with flat tonal values. No longer is there a good black in the image, plus the greens among the trees at left look extremely unnatural. HDR can give you the same unwanted effect, if we allow it to, but that can be remedied by un-checking the one image that's causing the issue
during the HDR process.
Some consider that look as 'art', but if you want
art, how about this?! . . .
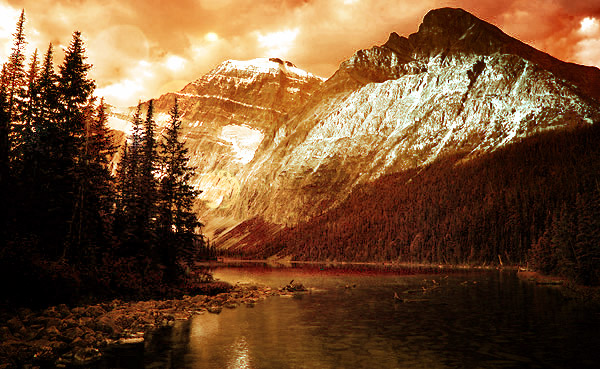
Garish, but at least it has drama!
So what is a good balance in terms of exposure and manipulation? I believe it to be
image 4 below. It was exposed at the same settings as image 2, but with just a moderate and appropriate amount of shadow adjustment applied to the image. First though, lets look at
image 2 once more for a direct comparison, then image 4 . . .
An exposure for the highlights, image 2 repeated.
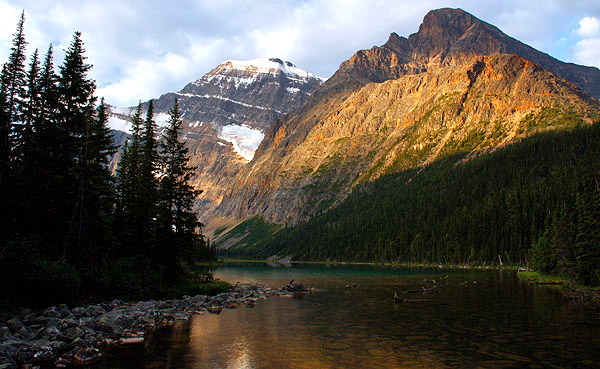
Image 4: Same as image 2 immediately above, but with a little
work done to lighten the foreground shadows.
As the foreground was in shade I feel that it should remain so, but also benefit from a subtle use of the
[lighten] 'shadow' option in Photoshop. Consequently, in my opinion that is, image
2 represents the ideal exposure for this and similar lighting situations, while
image 4 is an acceptable final image.
|
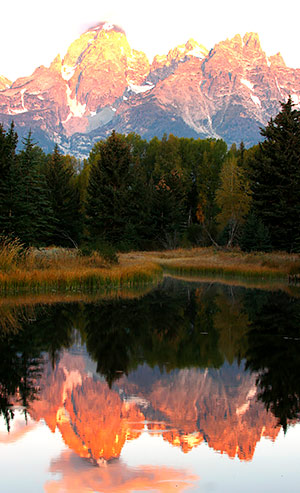
Grand Teton National Park, Wyoming |
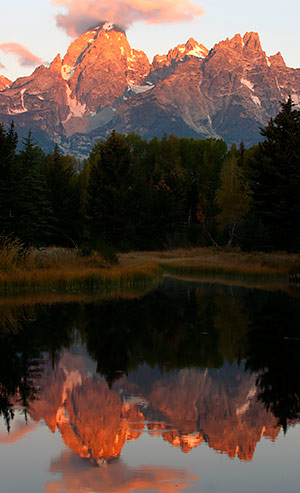
Grand Teton National Park, Wyoming |
| |
|
One final pictorial reminder to expose for the
highlights. At left the reflection and middle ground could be
considered as correctly exposed, but the burnt out mountain tops are
unacceptable as a result. Better to expose for the highlight as in
the image at right, leaving the middle ground and reflection
to be adjusted should you want to. 
Remember that whatever you photograph, the end result is limited only by your imagination!

