How does one determine the depth of field? Some may suggest using a shovel
[sorry, couldn’t resist!], but we’re speaking photographically, so we’ll tackle
the subject head on as it is important to do so if you want full control of your
picture taking.
So just what is
‘depth of field’? In a nutshell, it’s the apparent and the acceptable sharpness
of an image which we can control via the use of different lens apertures.
Wikipedia puts it another way . . . “Depth of field is the distance between
the nearest and farthest objects in a scene that appear acceptably sharp in an
image”.
As you may have
gathered by now, depth of field is a difficult subject to explain in simple terms,
so here are a pair of illustrations that might be of help . . .
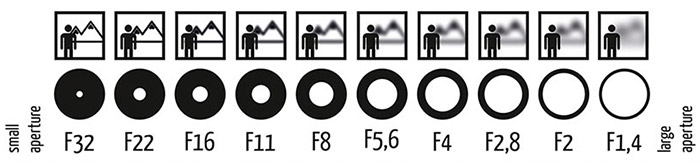
Choosing an
aperture to suit your subject
The thing to study closely above are the squares containing the lone figure in
front of a mountain. Note that the figure in the image is the point of focus,
and as we go from left to right you'll see that the aperture - small to large -
controls how much the background is in focus. The smaller the aperture, the more
'in focus' the mountain or background is.
At the largest aperture - in this case f1.4 - the background is diffused, and has the added advantage of making the
subject stand out. This could be termed as a 'selective focus' which is a
particularly pleasing technique when shooting flowers close-up or in macro mode.
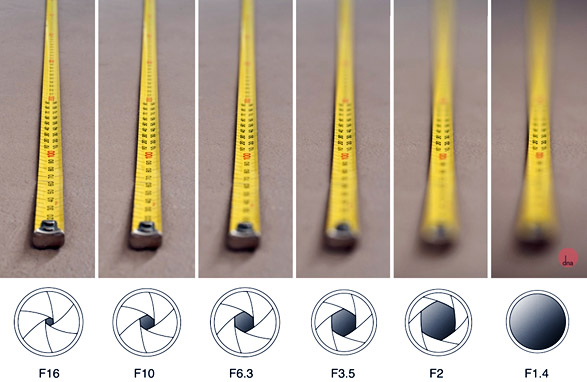
In this next
image the focus is once again on one spot, i.e. at around the half-way point
along the tape measure in each image. This time we start from the left with the
smallest aperture of f16 - it could also be f22 or f64 and so on - whereby most of the image is in focus. At the opposite
end we find that f1.4 provides minimal depth of field with very little 'in
focus'. This is termed as 'shallow' depth of field.
It's a
scientific fact
Unlike the first illustration which used a landscape as an example, the tape
measure examples are close-up shots whereby depth of field is even more limited.
The same applies to long or telephoto lenses, i.e. even if you use apertures
of around f22 to f32 when photographing a person in front of a mountain, getting
both subjects in sharp focus is an impossibility. The solution, at the cost of
perspective, is to use a wider/shorter lens or position the subject further from
the camera so that it is at a similar focusing distance as the background.
OK, so enough
of the theory, now to some examples from the real world . . .
|

A long lens perspective with a large aperture of f4 |

A long lens perspective with a small aperture of f22 |
| |
|
|
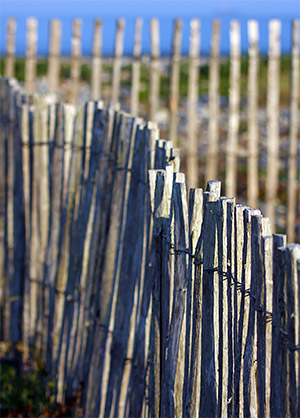
A long lens perspective with a large aperture of f4 |
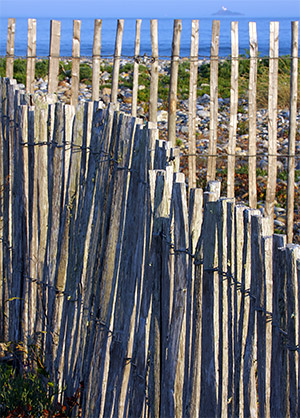
A long lens perspective with a small aperture of f22 |
| |
|
|
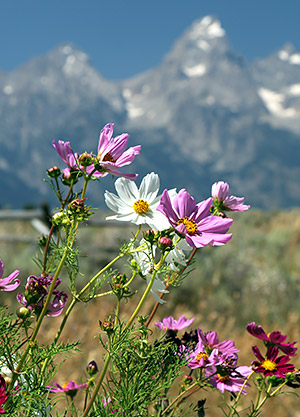
Using a long lens from a distance and focusing on the flowers,
the background is automatically thrown out of focus. |

As with the flower image at left, the background
is out of focus and subsequently isn't distracting.
PS: This is my son Andrew taken a few years ago! |
| |
|
The message these images convey is: A: Wide apertures 'isolate' the subject by
rendering the background as 'soft' and unobtrusive, and B: Small apertures bring
both foreground and background details into focus . . . not unlike the way the
human eye perceives a scene.
So now back to the opening question: How do we determine the depth of field, and
added to that, how do we apply it to the subjects we are photographing? Depth of
field is a photography basic that has been affected by the digital age,
i.e. the additional ability for
Focus stacking and
Depth of field bracketing and Focus bracketing for example. Wikipedia will
handle those advanced aspects for you – just follow the links – while I continue
with the all-important basics . . .
First off,
‘shallow’ depth of field . . . For example, a portrait or a flower are best
photographed with a lens of say 100mm or longer as the depth of field at these
focal lengths is very ‘shallow’, and it is desirable to ‘isolate’ the subject.
Good depth of field - inherent with wide angle lenses in say the 18mm to 50mm
range - would clutter your image
somewhat by bringing into focus any background distractions. Therefore, large
apertures of say f4 and f5.6 and so on are ideal for such ‘singular’ subjects.
Secondly,
‘large’ depth of field . . . The reverse is applied to landscapes, et cetera.
In situations where you probably want those wild flowers a few feet from the
camera, and the distant mountains all sharp [in focus], good depth of field is
desirable. To achieve this you will want to use apertures in the range of f16
and f22 et cetera. Where you focus is important too, i.e., you should focus on
the foreground subject – for instance, flowers – and not on infinity.
You can also
estimate your depth of field by using the depth of field preview button on your
single lens reflex camera, or by doing your best to understand the apertures and
distances that are marked on the top of your lens barrel.
Close up
photography – or macro - is an area of photography where good depth of field
is hard to achieve. Strong artificial light can enable you to use apertures of
f16, f22 and smaller, but even so your depth of field will be just a matter of
fractions or at best, inches.
Rule of
thumb . . . One last thing to remember is the higher your lens aperture
number is, the smaller the aperture, and greater is the depth of field . . . for
example, f22. The lower the number of your lens aperture, the larger the aperture
opening and shallower is your depth of field . . . for example f4.
Phew! OK, so in
conclusion, if you’re able to master these fundamental depth of field concepts,
you are well on your way to taking better photographs!

Remember that whatever you photograph, the end result is limited only by your imagination!

